Introduction
Version control is essential for managing, tracking, and collaborating on R projects efficiently. By integrating Git within Visual Studio Code (VSCode), you streamline your R programming workflow, enabling easy collaboration, history tracking, and conflict management.
In this guide, you’ll learn the fundamentals of using Git with your R projects in VSCode, ensuring a productive and seamless experience.
Why Use Git for R Projects?
Integrating Git into your R workflow provides significant advantages:
- Track Changes: Maintain a clear history of code modifications, enabling quick rollbacks and audits.
- Collaboration: Easily collaborate on R projects, manage contributions, and conduct code reviews.
- Backup and Recovery: Securely backup your projects to platforms like GitHub, protecting your code from data loss.
Setting Up Git in VSCode for R Projects
Follow these straightforward steps to set up Git within your VSCode environment:
- Install Git:
Download and install Git from the official Git website.
- Configure Git in VSCode:
Set your global user information by opening VSCode’s terminal:
git config --global user.name 'Your Name'
git config --global user.email 'your.email@example.com'- Initialize a Git Repository:
In your R project directory, initialize Git by running:
git initThis creates a .git folder to store your project’s version history.
Essential Git Commands for Managing Your R Project
Efficiently manage changes in your R project with these Git commands:
- Stage Files for Commit:
git add .Stages all changes in the current directory.
- Commit Changes with Meaningful Messages:
git commit -m "Your descriptive commit message"Commit messages should clearly describe the purpose of changes.
- Push Changes to Remote:
git push origin mainPushes your commits to the remote repository (e.g., GitHub).
Managing Git from the VSCode Source Control Tab
VSCode’s integrated Source Control feature simplifies version management:
- View File Changes: Track modified, added, or deleted files at a glance.
- Stage and Commit Easily: Stage changes, write commit messages, and commit directly within VSCode.
- Pull and Push: Sync your project seamlessly with remote repositories.

Read more about VSCode’s Source Control features.
Effective Branch Management in Git
Branches help you manage new features or bug fixes without disturbing the main codebase:
- Create and Switch to a New Branch:
git checkout -b feature/new-analysis- Switch Between Branches:
git checkout mainVSCode’s Source Control interface provides visual branch management tools for easy switching.
Working with Remote Repositories and GitHub Integration
Collaborate effortlessly using platforms like GitHub:
- Set Up a Remote Repository:
After creating a repository on GitHub, link your local repository:
git remote add origin https://github.com/username/your-repository.git- Push Changes to GitHub:
git push -u origin mainPushes your commits and sets GitHub as the upstream repository.
Resolving Merge Conflicts in VSCode
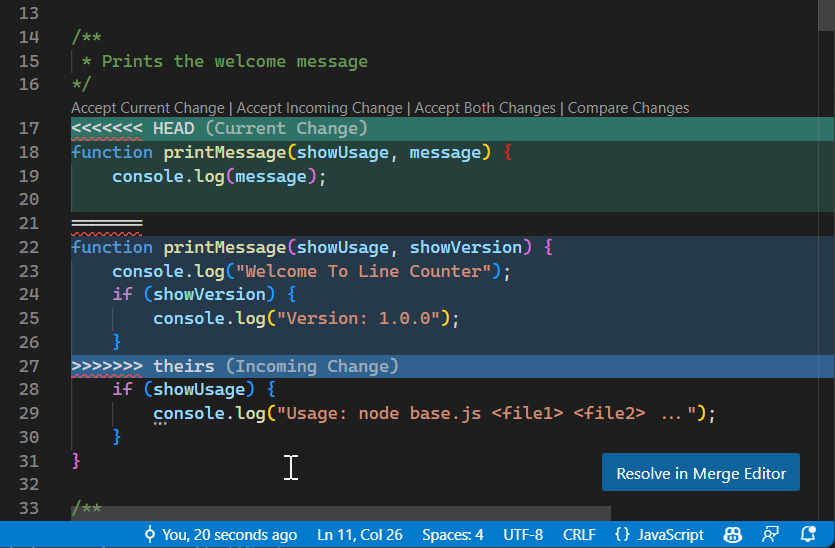
Merge conflicts arise when multiple users modify the same file. VSCode simplifies conflict resolution with intuitive visual tools:
- Identify Conflicts: VSCode highlights conflicting code sections clearly.
- Resolve Easily: Select to keep incoming, current changes, or merge both interactively.

Read more about resolving merge conflicts in VSCode.
Best Practices for Git in R Projects
To maximize Git efficiency in your workflow, follow these best practices:
- Frequent Commits: Commit small, logical units of work frequently.
- Clear Commit Messages: Provide meaningful messages to maintain clarity.
- Branching Strategy: Create branches for new features, experiments, or bug fixes.
- Regular Synchronization: Frequently pull updates before pushing to prevent merge conflicts.
GitHub Collaboration Features
Enhance collaboration using GitHub’s advanced features:
- Pull Requests: Facilitate reviews and discussion before integrating changes.
- Issues Management: Efficiently track tasks, bugs, and feature requests.
- GitHub Copilot Integration: Leverage AI-assisted coding directly within VSCode.
Example Workflow: Seamless Git Integration for R Projects
A streamlined workflow for using Git with R projects in VSCode:
- Initialize Project Repository: Start your project with Git initialized (
git init). - Create a Feature Branch: Isolate new developments (
git checkout -b new-feature). - Commit Regularly: Stage and commit your progress frequently.
- Push and Create Pull Requests: Push your branch and open a pull request on GitHub.
- Review and Merge: Collaborate through reviews, then merge upon approval.
Conclusion
Integrating Git into your VSCode workflow provides powerful version control, enabling efficient collaboration, organized development, and secure code management for your R projects. VSCode’s intuitive integration makes managing versions seamless, helping you maintain a productive and robust workflow.
Continue enhancing your R programming skills by exploring advanced topics such as Interactive R Programming and R Package Development in VSCode.
References & Further Reading
Explore More Articles
Here are more articles from the same category to help you dive deeper into the topic.
Reuse
Citation
@online{kassambara2025,
  author = {Kassambara, Alboukadel},
  title = {Version {Control} with {Git} for {R} {Projects} in {VSCode}},
  date = {2025-03-23},
  url = {https://www.datanovia.com/learn/tools/r-in-vscode/version-control-with-git-for-r-projects.html},
  langid = {en}
}
